
Using a Sandbox Environment to Emulate an SMB Brute Force/Dictionary Attack Using Netexec
One of the more fascinating facets of cybersecurity is the complex “cat and mouse” game played between threat actors and security professionals. This constant state of competition drives the creation of increasingly sophisticated systems and attack vectors. While reading about these methods provides a high-level understanding, nothing compares to the thrill of falling down a rabbit hole to truly grasp these threats firsthand. This curiosity led me to one of the most enjoyable projects I’ve undertaken: building a controlled environment to replicate a real-world attack.
Required Third-Party Applications
To achieve my goal of building a virtual sandbox with a victim, a threat actor, a vulnerability scanner, and a SIEM, I utilized four distinct components:
- Vulnerable Machine: A Windows Server 2022 instance, chosen because it is one of the most ubiquitous server environments in professional settings.
- Attack Machine: A Kali Linux VM, the industry standard for hosting a wide array of penetration testing tools.
- Vulnerability Scanner: Tenable’s Nessus, which provided a realistic look at how enterprises identify network weaknesses.
- SIEM: Microsoft Sentinel, leveraging my existing experience with Azure to log and analyze data behind the scenes.
Environment Network Structure
To ensure safety, I spent time researching the best network configuration to isolate Kali Linux. It was vital that the attack machine could not communicate with the public internet, only with the target and my host.

The Kali Linux VM is configured with a Host-Only Network, connecting it directly to the Windows Server. The Windows Server utilizes a dual-adapter configuration:
- Host-Only Adapter: Facilitates direct communication with the Kali machine for the attack.
- NAT Adapter: Provides the server with internet access for updates and Azure connectivity while keeping it isolated from my physical home network.
Once established, I verified connectivity by adding both VMs’ internal IPs to the Nessus scanner.
Before We Begin Testing...
Before launching the attack, we must prepare Microsoft Sentinel to act as our “Defender.” This involves four key steps to bridge the gap between our local VM and the Azure cloud:
- The Log Analytics Workspace: This is the “container” or database in Azure where all our logs will be stored. We create this first, then “onboard” Sentinel on top of it to provide the analytical power.
- The Content Hub & Data Connectors: Within Sentinel, we visit the Content Hub to install the Windows Security Events solution. This provides the templates and logic needed to understand Windows logs.
- Azure Monitor Agent (AMA) & Data Collection Rules (DCR): To actually get the logs from our Windows VM to Azure, we must install the Azure Monitor Agent on the server. We then create a Data Collection Rule (DCR). This rule acts as a filter, telling the agent exactly which logs to send (e.g., “all Security Events”) and where to send them (our Log Analytics Workspace).
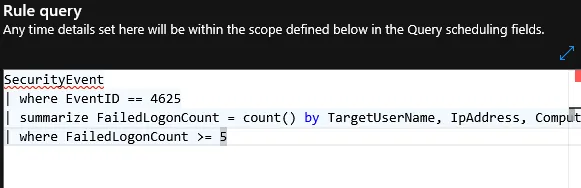
- Creating the Analytics rule: Before starting the attack, I navigated to the Analytics blade in Sentinel and created a Scheduled Query Rule. I wrote a KQL script to monitor for a specific pattern: more than 5 failed login attempts (Event 4625) followed by a successful login (Event 4624) from the same IP within a 10-minute window.
By ensuring the “Security Events via AMA” connector shows a status of “Connected,” we confirm that every login attempt- successful or failed- is being streamed to the cloud in real-time.
Initial Verification Testing
With the architecture ready, I performed a simple connectivity test. I used Kali Linux to ping the Windows Server to ensure the Host-Only network was routing correctly.
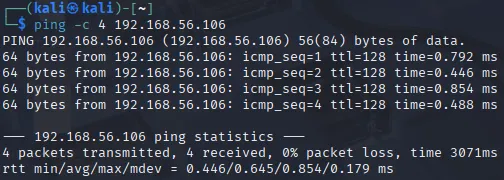
As seen above, the four successful pings to 192.168.56.106 confirmed our target was in sight.
Using 'Hydra' to Deploy the Attack
Kali Linux organizes its tools by the MITRE ATT&CK categories they serve. We find Hydra under Credential Access.
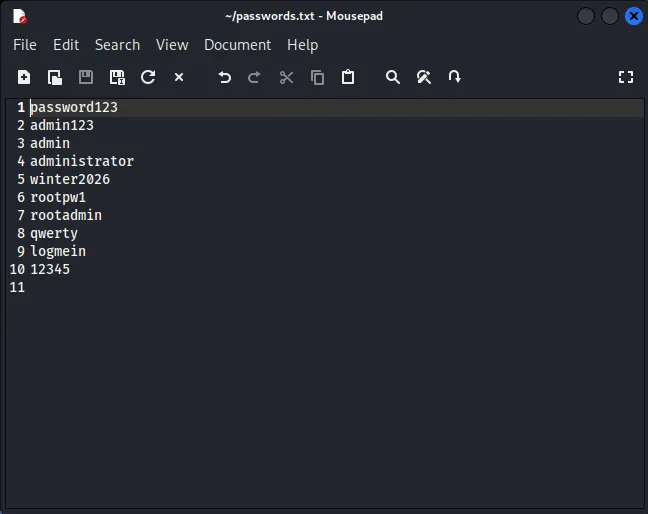
I created a passwords.txt file containing several fake passwords and one correct one to simulate a Dictionary Attack. The command structure for Hydra is as follows:
hydra: Calls the tool.-l root: Specifies the target username (which I knew for this lab).-P passwords.txt: Points to the password list (Capital ‘P’ is used for a file path).smb://192.168.56.106: Points to the protocol (SMB) and the target’s IP.
Final command: hydra -l root -P passwords.txt smb://192.168.56.106
Overcoming the First Error
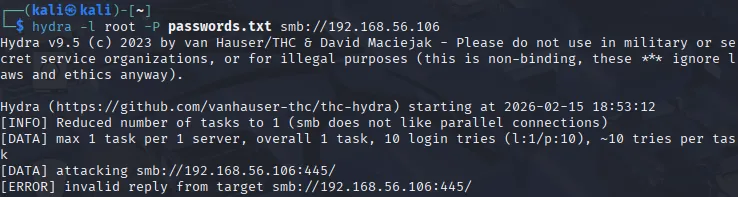
My initial run resulted in an “invalid reply from target” error. Troubleshooting revealed that Hydra’s SMB module sometimes struggles with the modernized security requirements of Windows Server 2022. Rather than compromising the server’s security settings to accommodate an older tool, I pivoted to NetExec (NXC), a more modern versatile tool for testing Windows environments.
The NetExec command followed a similar logic:
nxc smb 192.168.56.106 -u root -p passwords.txt
Results From Netexec

We have reached success! The tool correctly identified the target as Windows Server 2022 Build 20348. After five failed attempts - which I knew would be generating Event ID 4625 in my Sentinel logs - the sixth attempt found the correct password, marked by the [+]. This verified that our “threat actor” successfully gained credential access.
Analyzing the Defender's Perspective
The beauty of a SIEM like Microsoft Sentinel is that it doesn’t just show you that someone logged in; it tells you the whole story of how they tried. In Windows security, every action leaves a digital fingerprint known as an Event ID.
For this attack, two specific IDs were seen in our results:
- Event ID 4625: An account failed to log on. This is what triggered for every wrong guess in our dictionary file.
- Event ID 4624: An account was successfully logged on. This triggered once the tool found the correct password.
Upon additional analysis, I confirmed that the IP originating from the attack machine correctly aligns with the Kali machine’s IP.

Hunting for Logs with KQL
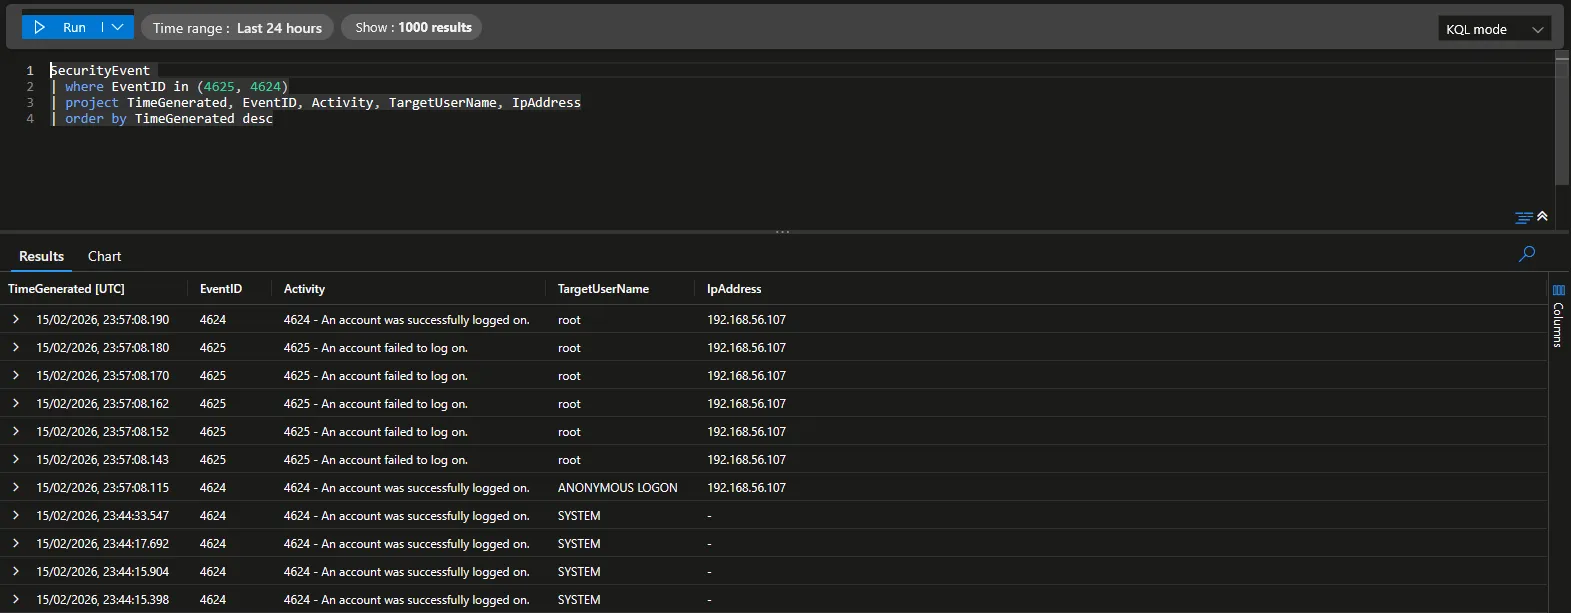
To verify the attack, I headed into the Logs section of my Sentinel workspace. Sentinel uses KQL (Kusto Query Language), which is highly efficient for sifting through millions of events. I ran a simple query to see the timeline of events coming from my Windows Server:
SecurityEvent
| where Computer == "SOC-SERVER"
| where EventID in (4624, 4625)
| project TimeGenerated, EventID, TargetUserName, IpAddress, LogonTypeName
| sort by TimeGenerated desc
The results were a perfect textbook example of a brute force attack. I saw a rapid-fire sequence of 4625 (Failures) all coming from the same source IP (my Kali VM) immediately followed by a single 4624 (Success).
Turning Logs into Alerts
Seeing logs is one thing, but a SOC Analyst can’t stare at a screen 24/7. To make this “production-ready,” I used Sentinel’s Analytics Rules to create an automated alert.
I configured a Scheduled Query Rule with the following logic: If there are more than 5 failed login attempts (4625) followed by a success (4624) from the same IP within 10 minutes, trigger an Incident.
When I ran the attack again, Sentinel did exactly what it was designed to do. Within minutes, the Incidents dashboard lit up with a Medium Severity alert. Clicking into the incident allowed me to see the “Entity Map,” visually linking the Attacker IP to the Target Server- providing the clear, actionable evidence needed to begin an investigation.
Lessons Learned & Remediations
This lab exercise highlights why “default” configurations are often insufficient for modern security. Based on the successful brute-force entry, here are the primary remediations I would recommend in a production environment:
- Account Lockout Policy: The most effective defense against this specific attack. By configuring Windows to lock an account after 3 or 5 failed attempts, the dictionary attack would have been halted after the first few guesses.
- Enforce Strong Passwords: The attack succeeded because the password was in a common dictionary. Enforcing complexity and length makes the “math” of brute-forcing nearly impossible for attackers.
- Disable Unnecessary Protocols: If SMB is not strictly required for a specific server’s role, disabling Port 445 closes the “door” entirely.
- Implement Multi-Factor Authentication (MFA): Even with a stolen password, an attacker cannot complete the login without a secondary token, rendering the brute-forced credentials useless.
- IP Whitelisting: Restricting SMB access to only known management IP addresses would have prevented the Kali VM (on a different IP) from even “seeing” the service.
This project was a fantastic way to see both sides of the coin. It’s one thing to read that “strong passwords matter,” but seeing a green [+] appear on an attack machine because of a weak password makes the practicality of the lesson stick.
AD.